


October 2018 Update:
Fixed a problem that caused a reboot at the end of the installation, canceling and preventing continuing the installating and configuring the latest components.
August 2018 Update:
Have been added more drivers from newest Intel's chipsets; more USB 3.0/3.1 drivers and more Samsung NVMe drivers as well as corrections of these latter drivers since they were not installed well in some cases. We have also added more than 25 new fonts to Windows, making a total of more than 300 new fonts compared to the original version of Windows 7.
ISO Media Install for Windows 7 SP1 x64 English and Spanish on DVD or USB with lastest platforms support including Coffee Lake (Z370), Skylake (Z270), Skylake-X, Skylake-E (X299), Broadwell-E, Haswell-E (X99), etc. and lastest drivers support including USB 3.0/3.1, NVMe, RAID, Thunderbolt and all windows updates until October 2018.
This media install includes the following 64 bits edtions of Windows:
- Home Basic (x64)
- Home Premium (x64)
- Professional (x64)
- Ultimate (x64)
We will continue updating this installation media as they come out new updates or devices, in order to install Windows 7 quickly and easily on any computer, even the most recent. We are also welcome comments and ideas to add more support and drivers suggesting that we go for future releases.
Due to the size of this update, which takes up about 5 GB., is recommended to create a bootable USB device. If you prefer to use a DVD drive, you will need a dual layer DVD to fit all installation files.
Important:
This is not a pirated version. It has been created from an original copy of Windows that can be downloaded from the Microsoft website itself and does not include any activation key or any system activation. You must enter your activation key or only work for 30 days in trial version mode.
Integrated Drivers
This Windows 7 SP1 64-bit ISO media installer includes support to install it from a USB 3.0/3.1 port included in the latest models of current computers, as well as to be able to install it in the latest models of NVMe, RAID, AHCI units, etc. The drivers that have been added and integrated to the Windows installation are the following:
- Intel Chipset Drivers versions 10.1.1.45, 10.1.2.19, 10.1.17541.8066 and 10.1.16.3 (last version of August 2018).
- Intel USB 3.0 and 3.1 drivers versions 1.0.10.255, 2.5.0.19, 5.0.4.43 and 15.2.30.280 respectively (latest versions of August 2018).
- ASMedia USB 3.0 and 3.1 drivers 1.16.49.1 (last version of July 2018).
- Intel Rapid Storage: SATA, AHCI and RAID drivers 15.9.0.1015 (last version of July 2018).
- Intel Rapid Storage Enterprise: AHCI, NVMe, RAID and VROC drivers 5.4.0.1464 (last version of July 2018).
- Microsft NVMe driver and patch (KB2990941 and KB3087873) (only one version available of June 2016).
- Intel NVMe and Optane driver 4.0.0.1007 (last version of July 2018).
- Samsung NVMe 9xx drivers 1.4.7.17 and 3.0.0.1802; and Samsung NVMe SM961, PM961 driver 2.4.7.0 (last version of July 2018).
- Intel Thunderbolt driver 15.3.59.2 (last version of July 2018).
These are the drivers that have been added to the Windows installation program, so that it can be installed from these new devices, such as USB 3.0/3.1 storage devices (pendrives, DVD's, etc.), to new devices such as NVMe or RAID drives.
We also added to Windows, once it is installed, all updates available for Windows 7 SP1 64-bit until July 2018 and the following additional drivers:
Wired LAN Network Adapters:
- Intel LAN Network Adapter version 23.2 (last version of July 2018).
- Broadcom LAN version 17.2.0.2 (for older Wi-Fi Network Adapters).
- Realtek LAN version 7.116.119.2018 (last version of July 2018).
- Killer (Rivet Networks) LAN version 9.0.0.46 (last version of July 2018).
- Aquantia 5G LAN version 1.40.42.0 (last version of July 2018).
- Aquantia 10G LAN version 1.40.42.0 (last version of July 2018).
Wi-Fi (Wireless) Network Adapters:
- Intel Wireless PROSet version 20.30.0.7 (last version of July 2018).
- Qualcomm Atheros Wi-Fi version 11.0.0.768 (for older Wi-Fi Network Adapters).
- Qualcomm Atheros Wi-Fi version 12.0.0.149 (last version of July 2018).
- Killer (Qualcomm Atheros) Wi-Fi version 12.0.0.448 (last version of July 2018).
- Broadcom Wi-Fi version 7.35.317.1 (last version of July 2018).
- Realtek Wi-Fi version 2023.66.1104.2017 (last version of July 2018).
Bluetooth Adapters:
- Intel Bluetooth version 20.30.0.3 (last version of July 2018).
- Qualcomm Atheros Bluetooth version 4.0.0.740 (last version of July 2018).
- Broadcom Bluetooth version 12.0.1.65 (last version of July 2018).
- Realtek Bluetooth version 1.4.1001.3 (last version of July 2018).
Video Drivers:
- Intel Iris and HD Graphics version 15.45.16.4627 (last version of July 2018).
- NVIDIA Video Display version 398.36 (last version of July 2018).
- AMD Radeon Adrenaline Video Display version 18.6.1 (last version of July 2018).
Others:
- Intel Turbo Boost Max 3.0 Technology Driver version 3.0.1035 (last version of July 2018).
Integrated Updates, Programs, Utilities and more Resources
Windows 7 is installed with all updates available in October 2018, except those which includes Telemetry that Microsoft uses to collect information from our use of Windows and those to try to download and upgrade to Windows 10 or show the Update Notification to Windows 10 constantly. Also included with this Windows 7 installation:
- Internet Explorer 11.
- Microsoft Silverlight
- .NET Framework 4.7.2
- More than 280 new fonts, standard and more common.
- More than 135 new wallpapers in high quality, resolution and size.
- Classic Shell 4.3.1 (more details explained later)
Default Configuration
In this installation we have also configured the following features and options:
- The C Drive on which Windows 7 has been installed, has been labeled "System".
- Paging file has been set on drive C, with an initial size of 4,096 and a maximum size of 16,384.
- The system is configured to not write debugging information or automatically reboot if a system error occurs (BSOD - Blue Screen of Death).
- Hybernation is disabled. This saves the same amount of RAM memory on the drive where Windows is installed.
- Prefetch and Superfetch service is disabled, recommended when the operating system is installed on SSDs.
- Customer Experience Improvement Program is set to "No, I don't want to participate in the program." by default, since it is a Telemetry program that Microsoft uses to collect information from the use we make of Windows, the programs that we have installed, and all of our data that we have on the computer.
- The Telemetry service "Diagnostics Tracking Service" is disabled, that Microsoft uses to collect information from the use we make of Windows, the programs that we have installed, and all of our data that we have on the computer.
- 11 Telemetry Scheduled Tasks have been eliminated: Ait Agent, Microsoft Compatibility Appraiser and ProgramDataUpdater in Application Experience; Proxy in Autochk; Consolidator, KernelCeipTask, OptinNotification and UsbCeip in Customer Experience Improvement Program; Microsoft-Windows-DiskDiagnosticDataCollector in DiskDiagnostic; ValidationTask and ValidationTaskDeadline in Windows Activation Technologies.
- Auto Repair on boot is disable. On RAID's or new devices the auto repair feature can damage storage devices because not has all drivers. Is also available to access to Repair pressing F8 on boot and selecting "Repair Your Computer".
- Installation of all games in Professional Edition.
- The option to "Always show all icons and notifications on the taskbar" has been enabled by default.
- The option to Show My Computer, Network, Control Panel, User Files and Recycle Bin icons on desktop has been enabled by default.
- The option to "Hide extensions for known file types" has been disabled by default.
- The option to "Always show full path in title bar" has been enabled by default.
- The option to "Always shows menus" has been enabled by default.
- The users folders "My Documents", "My Pictures", "My Music" and "My Videos" has been renamed as "Documents", "Images", "Music" and "Videos" respectively by default.
- The text "Shortcut" has been removed each time a shortcut is created.
- It has been set to 36 points of horizontal and vertical spacing between icons on desktop that saves a lot of space.
- The "Command Prompt" application has been set with a larger window size and larger text, so they do not look so small.
- In the Spanish version, the clock is set to synchronize with the Internet time server of the Spanish Royal Institute and Observatory of the Navy (hora.roa.es). More information: Spanish Royal Institute and Observatory of the Navy (in Spanish).
- Google is set as default search engine and home page in Internet Explorer 11. Other available search engines are Wikipedia and RAE (Spanish dictionary from "Real Academia de la Lengua")
Classic Shell
This installation of Windows, also installs and configures the latest version of the Classic Shell 4.3.1 program that allows to expand the "All Programs" menu of the Windows Start Menu as in Windows XP, it also shows the button "Up folder level" in the Windows File Explorer, button that was also available in Windows XP and removed in Windows 7 and allows to see the full path in the title bar of the Windows File Explorer. In addition, a Toolbar in the Windows File Explorer has been configured with the most used commands as shown in the following images:
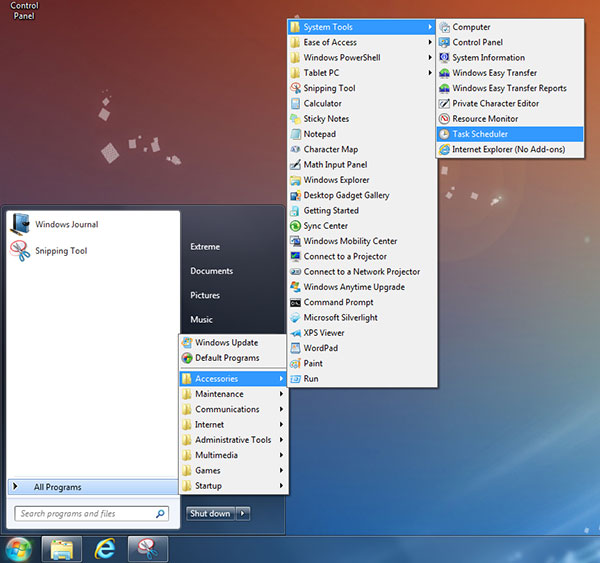
Expanded "All Programs" menu thanks to Classic Shell utility.

Show full path in title bar, Level Up folder button and Windows File Explorer toolbar thanks to Classic Shell utility.

Show web page title path in title bar in the Internet Explorer window thanks to Classic Shell utility.
First Logon
Once Windows is installed and complete the initial wizard where we create a new administrator user and set other options, the first logon can take up about more than 5 minutes depending on the performance of the computer. This is because some updates, programs, utilities and configurations that could not be integrated into the installation process are installed in this last step.
Once the installation of Windows has been completed and you have logged in for the first time, you must restart Windows, even if not request it, so that you can finish the installation and configuration.
Windows Update Configuration
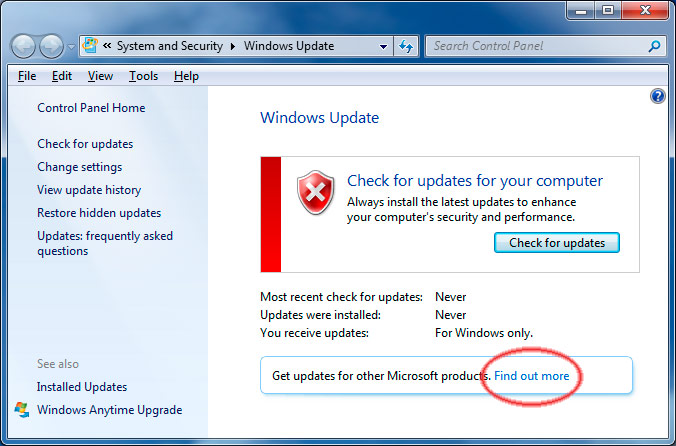
When you run Windows Update for the first time, the default setting is to check for updates "For Windows only". If we want to check for updates "For Windows and other products from Microsoft Update", we must click on "Find out more" as shown in the following figure:
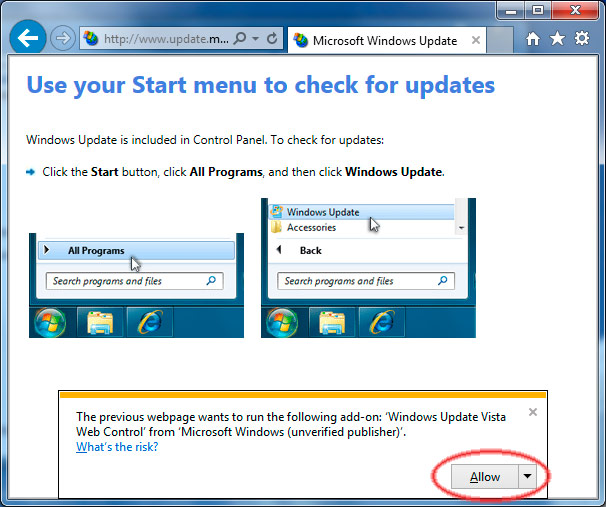
Next, Internet Explorer 11 opens, and asks if we want to run a complement. Click on the "Allow" button as the following image shows:
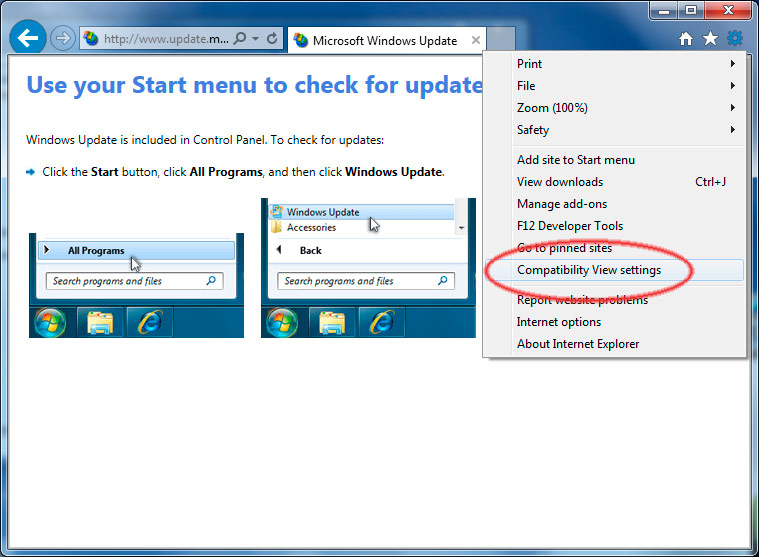
Internet Explorer shows now a screen indicating that we need to use "Windows Update" to check for updates. We click on the settings icon and select "Compatibility View Settings" as shown below:
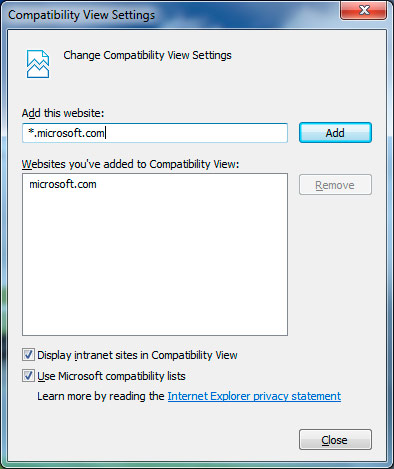
In the "Compatibility View Settings" click on the "Add" button, to add the current Microsoft website, and then click to the "Close" button as shown in the following image:
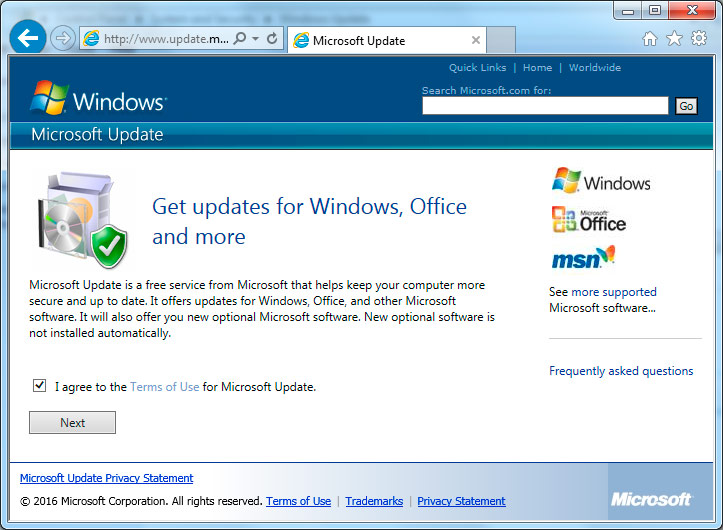
Close Internet Explorer, return on the Windows Update window and click again on "Find out more" and we will open Internet Explorer with the wizard for more updates as shown in the following image:
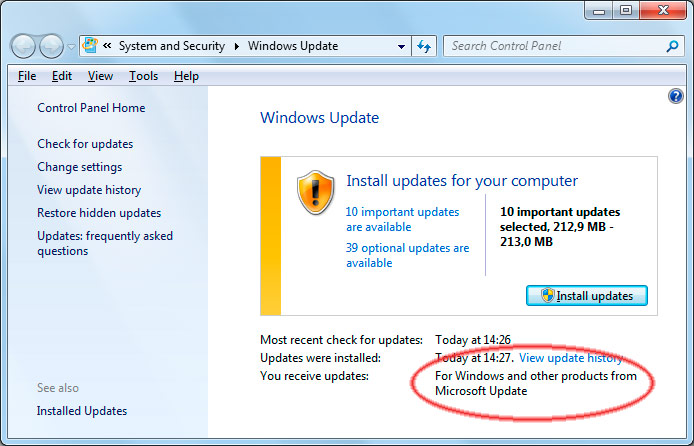
Once we have completed the wizard and Windows Update is configured to check updates "for Windows and other products from Microsoft Update" as shown in the following image, we can remove the entry from "microsoft.com" in the "Configuring Compatibility View" in Internet Explorer 11.
Block updates that adds telemetry.
When run Windows Update for the first time, we should block the following telemetry updates (selecting them with the secondary mouse button and pressing "Hide update" in the context menu). Updates that Microsoft uses to collect information from our use of Windows and others and to try to upgrade to Windows 10 and show notifications or warnings to upgrade to Windows 10. These updates are the following:
| KB971033 | KB2952664 | KB2976978 | KB2977759 | KB2990214 | KB3021917 |
| KB3022345 | KB3035583 | KB3068708 | KB3075249 | KB3080149 | KB3081954 |
| KB3123862 | KB3139929 | KB3146449 | KB3150513 | KB3170735 | KB3173040 |
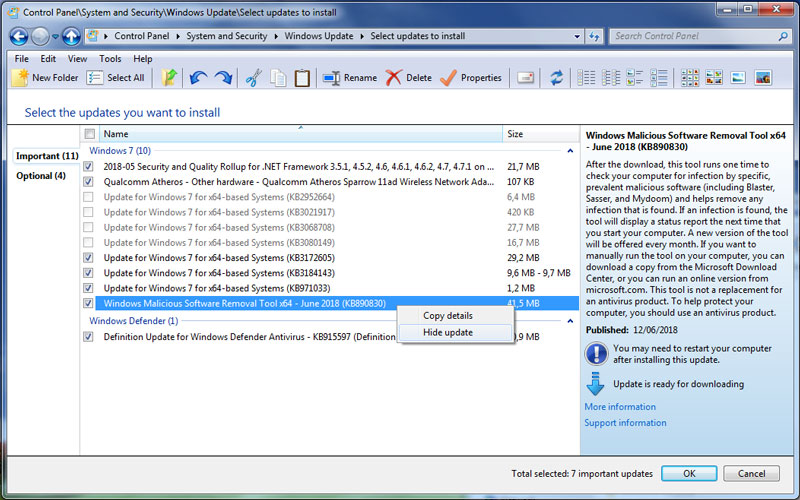
Blocking specific updates in Windows Updates.
This updates that must be blocked, they do not always appear all. Initially, the following always appear: KB2952664, KB3021917, KB3068708, KB3080149, KB3150513. The others may appear randomly in any other process update, even after months.
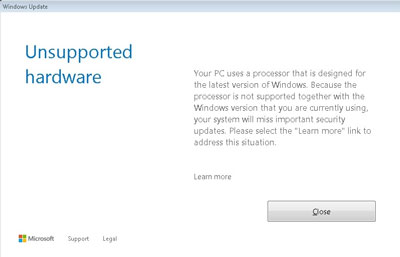
"Unsupported Hardware" windows message:
If the "Unsupported Hardware" screen message appears when trying to update Windows using Windows Update, download and install the wufuc utility from the following web page: https://github.com/zeffy/wufuc. Download and install the x64 msi file from the"Latest stable build" link in the downloads section of that web page. This program eliminates the limitation imposed by Microsoft to update Windows on computers with Coffee Lake, Kabylake and higher platforms and allows continuing installing updates normally without any problem. It is a secure program that can be trusted, since it is published all the source code of it and does not contain anything unsafe or strange.
Telemetry Serives and Scheduled Tasks.
Windows 7 included by default some simple Telemetry options that have been increasing and activating over time through Windows updates. Some of the most important ones have been disabled by default, such as the following:
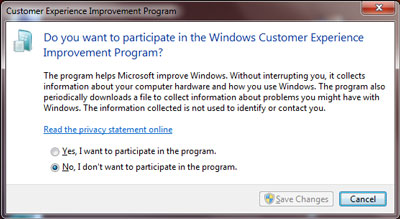
- Customer Experience Improvement Program is set to "No, I don't want to participate in the program." by default, since it is a Telemetry program that Microsoft uses to collect information from the use we make of Windows and the programs that we have installed.
- The Telemetry service "Diagnostics Tracking Service" is disabled, that Microsoft uses to collect information from the use we make of Windows and the programs that we have installed.
- 11 Telemetry Scheduled Tasks have been eliminated: Ait Agent, Microsoft Compatibility Appraiser and ProgramDataUpdater in Application Experience; Proxy in Autochk; Consolidator, KernelCeipTask, OptinNotification and UsbCeip in Customer Experience Improvement Program; Microsoft-Windows-DiskDiagnosticDataCollector in DiskDiagnostic; ValidationTask and ValidationTaskDeadline in Windows Activation Technologies.
It is very probably that as we install drivers and programs we will install services and tasks Telemetry programs of the companies that develop them, as is the case of the NVIDIA Geforce driver. If we have installed or updated the NVIDIA Geforce driver, when opening the "Task Scheduler" application and selecting the "Task Scheduler Library" in the left panel, we will find many tasks that start or contain "NVTm", which are Telemetry tasks to send data to NVIDIA of the use we make of the graphics card, programs, data, etc. All these entries that include "NVTm" should be eliminated by clicking on them and then pressing the "Del" key, or also by clicking on them with the secondary mouse button and then clicking on the "Delete" option in the context menu. Also if we open the "Services" application we will find a service called "NVIDIA Telemetry Container" that we recommend to disable.

Downloads
- Windows 7 SP1 x64 October 2018 ISO (English) - Mega (Download Torrent) (Torrent Magnet Link)
- Windows 7 SP1 x64 October 2018 ISO (Spanish) - Mega (Download Torrent) (Torrent Magnet Link)
Create USB Installation Media
We can create a USB installation medium that is bootable in a very simple way that usually works in most cases. Simply formatting the USB device as FAT32, which is the recommended format, and copying all the files contained within the ISO to the USB device. You can extract the ISO files with utilities such as WinRAR, UltraISO, WinISO, etc. without mounting it in a virtual drive.
If the previous step not work, we must first prepare the USB device. Take note that all the contents of the USB device will be deleted in this process. To do this, we open the "Command Prompt" as Administrator and perform the following steps:
- Type diskpart and then press the <Enter> key.
- Next, type list disk and press the <Enter> key and it will show us all the disks of our computer and we will have to find out the disk number that corresponds to our USB device, which can be known by size.
- Now, type select disk <X> where X is the disk number or drive letter of the USB device and then press the <Enter> key. Is very important to be sure of the disk number, because if you type a wrong disk number, we will completely delete the data from another disk irreversibly.
- Type clean and press the <Enter> key. This command will delete all data of the selected disk, in this case our USB device.
- To create a new primary partition on the USB device, type create part pri and press the <Enter> key.
- To select the partition that you just created, type select part 1 and press the <Enter> key.
- To format the partition in FAT32 format (recommended format), type format fs=fat32 quick and press the <Enter> key.
- To activate this new formatted partition, type active and press the <Enter> key.
- To exit DiskPart, type exit and press the <Enter> key and we can close "Command Prompt".
- Finally, we have to copy all the files contained within the ISO to the USB device and we will have ready our bootable USB device with which we can start an installation of Windows 7 SP1 updated to October 2018.
Installation Recommendations

When installing Windows 7 it is necessary to take into account certain options and configurations about the BIOS or UEFI of the computer, especially in the most current equipment. Normally we call BIOS a specification that defines an interface between the operating system and the physical components of the computer such as the motherboard, memory, processor, etc. (hardware/firmware). Since 2012, more extensive and predetermined, the BIOS of the computers began to be replaced by a new specification called UEFI (Unified Extensible Firmware Interface). The first implementations of UEFI also supported native BIOS (both) due to compatibility problems, but over time the standard CSM (Compatibily Support Module) was implemented, adding a standard UEFI compatibility with BIOS for non-UEFI compatible operating systems or hardware. The vast majority of computers since 2014, and even before, are UEFI. For all this we have to take into account the different ways in which a computer can work:
- Native BIOSmode (the vast majority of older computers prior to 2014).
- BIOS through CSM (Compatibily Support Module) mode on computers with UEFI interface (the vast majority of computers since 2014 aprox.).
- UEFI through CSM (Compatibily Support Module) mode on computers with UEFI interface (the vast majority of computers since 2014 aprox.).
- Native UEFI mode on computers with UEFI (not supported by Windows 7).
The best mode for Windows 7 is the third, UEFI through CSM mode, as long as we have hardware that support it. This is the only way in which Windows 7 can be installed and boot from an NVMe storage device. It is also the mode in which booting and loading Windows 7 is faster.
All the configuration options of the BIOS or UEFI are a bit confusing regarding this configuration or even some do not even have option to configure these modes. On the most simple UEFIs, they usually appear as Boot Type or with another name and with three options: 1. Legacy or Compatible or BIOS, 2. UEFI with CSM and 3. UEFI that correspond to the last modes of our list respectively.
Other more complex UEFI BIOS, such as those of the most advanced motherboards of ASUS, appears an option to activate or deactivate CSM. With CSM disabled, we would be in mode 4 of our list: native UEFI mode, in which Windows 7 does not work. When enabling CSM, the default "Boot Device Control" option is set as "UEFI and OPROM" and the other boot options is set by default as" Legacy only "and this would be equivalent to mode 2: BIOS using CSM. To put it in our mode 3: UEFI through CSM, we have to set the "Boot Device Control" as "UEFI only" and the other boot options as "UEFI driver first".
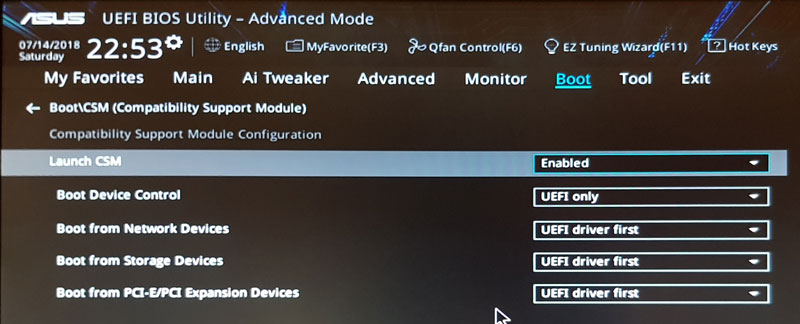
An ASUS motherboard configured as UEFI through CSM mode.
Finally, another very important point to take into account when configuring the UEFI BIOS is that Windows 7 does not support "Secure Boot" and this must be disabled. In the ASUS advanced motherboards within the Secure Boot option, it appears as "OS Type" and when is set as "Windows" means Secure Boot activated, and setting it as "Other OS" means Secure Boot deactivated which is the only option that works with Windows 7.
Troubleshooting and Tricks
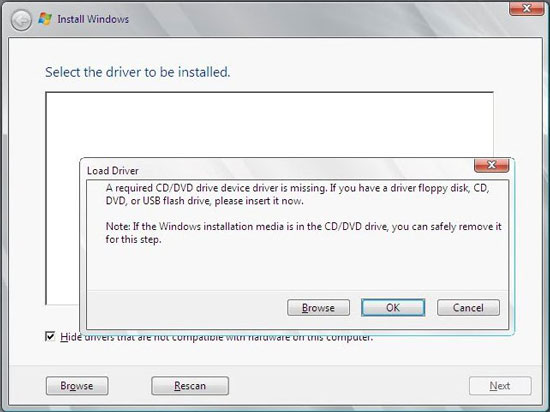
The biggest problem that can appear when we start the installation process is that when appear the message "A required CD/DVD drive device is missing." as the image on the right shows. This is due, when we are installing from a USB device, and the Setup program does not find USB drivers (drivers) in which our USB boot device is connected. Windows 7 installation not support USB 3.0/3.1 because not have a default USB 3.0/3.1 driver. Just support USB 2.0 only, so the simplest solution would be to connect our USB boot device to a USB 2.0 port that is normally black.
This problem comes with computers that no longer bring USB 2.0 ports. Only USB 3.0 or 3.1 ports that tend to be blue and greenish blue respectively. Although we have integrated main and most USB 3.0/3.1 controllers on the market today in this installation of Windows 7, there can always be computers with a very specific USB 3.0/3.1 driver, or with a new USB 3.0/3.1 driver model that has come out after the creation of this Windows 7 installation media ISO.
Also sometimes this problem is due to an error in the Windows 7 installation program itself. The first thing we must do is to find out if the installation program is recognizing our USB boot device by following these steps:
- As soon as the Windows 7 installation program starts and before doing anything, press Shift + F10 and "Command Prompt" window will open.
- In the "System Symbol" window, type C:
and press the <Enter> key. Type dir
and press the <Enter> key. If we see a list with the folders "boot", "efi", "source", "support" and "upgrade" means that the drive C is the drive
of our USB boot device. Otherwise, type D:
and press <Enter> and then type
diragain to check the folders and find out if they are from our USB device. So we continue consecutively with the next letters until we find our USB device. There will be a letter for each storage unit formatted in the computer. In a normal computer, there is probably nothing beyond letter H. - If we have found our USB boot device, then type cd sources in then "Command Prompt" windows and press the <Enter> key. Next, type setup and pressing the <Enter> key starts the Windows 7 installation program.
- In case we have not found our USB boot device, the last solution we have left and as an emergency solution to install Windows 7, is to boot the computer with an USB boot device with Windows 10 that can be created and downloaded very easily of the Internet with the Media Creation Tool from: https://www.microsoft.com/en-us/software-download/windows10.
- As soon as the Windows 7 installation program starts and before doing anything, change the USB device from Windows 10 to the Windows 7 USB device and wait at least 10 seconds to recognize it, then press Shift + F10 and "Command Prompt" window will open. Now continue through step 2. Installing Windows 7 in this way is very probably to start up without USB drivers, and in some cases we will not even have keyboard or mouse when Windows 7 is installed. This is solved by configuring in BIOS/UEFI the USB option (or the USB keyboard and mouse option) in compatible or legacy mode, if this option is available in the UEFI/BIOS. Still, already with keyboard and mouse, it is probably that we do not have access to any USB storage device so the only way to install the USB 3.0/3.1 driver would be through the network, CD or DVD, or booting from the Windows 10 USB boot device, pressing Shift + F10 that opens "Command Prompt", and then copy the USB driver from any USB device to the drive where Windows is installed.
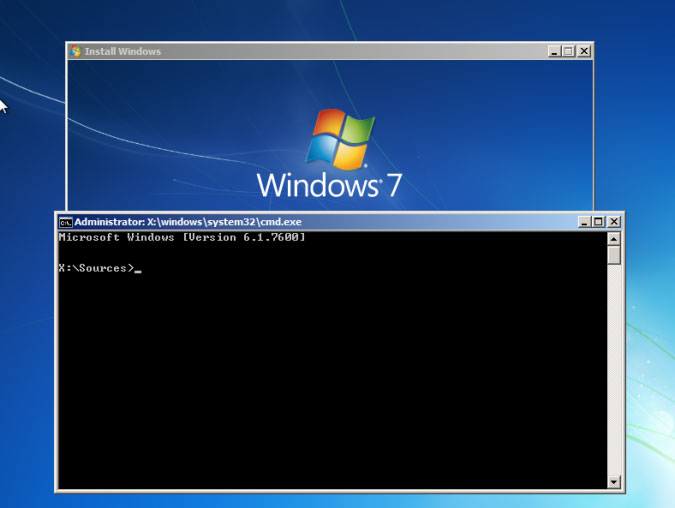
Pantalla del Símbolo del Sistema al pulsar las teclas Mays+F10 nada más arrancar el programa de instalación de Windows 7.
juan Antonio
publicado el martes 27 de septiembre de 2016 19:30:26 Europe/Paris